
Aeneas How-Tos
Aeneas makes your internet and telephone service simple by providing descriptions of residential and business calling features + internet and email set-up instructions. For further information, contact your local Aeneas office. Technical support is also available 24 hours a day, 365 days a year.
-
Telephone (VoIP, Fiber, OR XLink)
-
-
Automatic Recall
-
Use this feature to hear the phone number of the last person who called you or to return their call.
After dialing *69, you will be greeted with a recording of the last number that called, followed by an option to press 1 to be connected to that number.
Typically the automatic call return won’t work when you’re returning a call to a cell phone; however, you will still be able to access the number and then dial it manually to return the call. If the caller’s number is unavailable or blocked, you will not be able to recover it. If necessary, you can remove the record of the last caller’s number, so other people using your telephone will not be able to see who called. To find out the most recent incoming call to your telephone use the following access codes.
-
Automatic Callback
-
Automatic Callback allows you to automatically keep redialing a phone number that was busy.
To use the feature, call a person you wanted to speak with. After hearing a busy signal, hang up and then immediately pick the phone back up and dial *66.
You will hear a recording telling you if the Automatic Callback request was successful. If your request is unsuccessful, the caller you’re trying to reach may be with a phone company that doesn’t support this feature. Once it’s set up, Automatic Callback will continue redialing for 30 minutes. If the person you were trying to call hangs up within that timeframe, your phone will ring with a distinctive ringtone to alert you. Pick up the phone and you will be automatically connected with the person you were trying to reach.
To turn off the Automatic Callback before the 30 minute time limit, pick up their phone and dial *86.
-
Call Barring
-
Bar particular types of calls (for example international or 900 calls) so that nobody can make these calls from your telephone. To set up Call Barring from your telephone, use the following access codes. If you use an access code to stop Call Barring for any type of call, you will be prompted to enter your PIN as a security check.* If you bar all calls except emergency calls, you will not be able to access your other call features through your keypad until you unbar calls.
-
Phone Access Codes
-
Bar all calls except emergency calls – *341
Bar international, national and mobile calls – *342
Bar international calls – *343
Bar operator calls – *344
Bar calls to access codes for Call Services – *345
Bar calls to 900 numbers – *346
Stop barring all calls except emergency calls – *351
Stop barring intern’l, national and mobile calls – *352
Stop barring international calls – *353
Stop barring operator calls – *354
Stop barring calls to access codes for Call Services – *355
Stop barring calls to 900 numbers – *356
-
Caller ID
-
Caller ID reveals who’s calling before you answer a call, so you can decide whether or not you want to take it. The caller’s number is displayed on your phone when it rings. As an extension to caller ID, you can also have the name of the caller displayed on your phone when it rings. You need a telephone that can display Caller ID information to use this feature. Note that a caller’s information isn’t displayed if they’ve withheld it. To control information about the caller’s identity from your telephone, use the following access codes.
Display the caller’s identity – *65
Do not display the caller’s identity – *85
-
Call Forwarding
-
You can choose to have your incoming calls forwarded to a different number when you are unable to answer them. Note that you cannot forward calls to the following numbers: numbers starting 0, numbers starting 950, numbers consisting of one digit followed by 11 (including 911). To control call forwarding from your telephone, use the following codes.
Forward all calls – *72 + 1 + area code + phone number
Stop forwarding all calls – *73
Forward calls when busy – *90 + 1 + area code + phone number
Stop forwarding calls when busy – *91
Forward calls on no reply – 92 + 1 + area code + phone number
Stop forwarding calls on no reply – *93
-
Selective Call Forwarding
-
You can choose to forward all calls from specific callers to another telephone number. Note that your selective call forwarding settings act before your immediate call forwarding settings. Therefore, if you’re forwarding to two different numbers under your Immediate and Selective settings, your selected list of callers still be sent to your Selective Call Forwarding number while all others go to your Immediate Call Forwarding number. To set up selective call forwarding from your telephone, use the following access code, and follow the voice prompts for further instructions. This allows you the extra option of adding an anonymous number following a call where the caller withheld their number.
Set up selective call forwarding – *63 or *82
-
Remote Activation Call Forwarding
-
Call forward allows you to send incoming calls to a different number. You can set up this feature remotely by following these steps.
Dial 731-554-1510 or 800-319-9515.
Enter the 10 digit phone number that you want to forward.
Enter the 4 digit pin number for the number (typically its the last 4 digits of the phone number).
Enter *72.
Enter the 10 digit number you want to forward the call to.
At this point, the number you’re forwarding to will begin to ring. This is the system verifying that the number is valid. Someone must answer the phone to establish the forward. If no one answers, you can perform these steps again to establish the call forward.
Note: If you are calling to set up the call forwarding from the number you will be forwarding to (for example, from your cell phone) you will hear a call waiting audible tone and you should click over to answer the call and establish the call forward at that time.
To unforward follow these steps:
Dial 731-554-1510 or 800-319-9515.
Enter the 10 digit phone number that you want to un-forward.
Enter the 4 digit pin number for the number (typically its the last 4 digits of the phone number).
Enter *73
-
Call Rejection
-
Selective Call Rejection
This features allows you to reject calls from specific phone numbers. Your telephone will not ring when a call comes in from one of these callers; instead, the caller will hear an automatic message that the call has not been accepted.Anonymous Call Rejection
This feature automatically rejects all incoming calls for which the caller’s number is withheld.To control rejecting calls from your telephone, use the following access codes.
Reject anonymous calls – *77
Accept anonymous calls – *87
Set up Selective Call Rejection – *60 or *80
-
Call Trace
-
If you receive a malicious call, you can pass information about the call to the appropriate law enforcement agency. You can do this while the call is in progress, or after it’s finished (before you receive another call). To request a trace of the current caller during a call, press the recall button* on your telephone, then use the following access code, and wait for further instructions.* If your phone does not have a recall button you cannot request a trace during your call. You will always be able to make a trace request after the call has ended. To request a trace of the last incoming caller, use the following access code and follow the voice prompts for further instructions.
Call Trace – *57
-
Call Transfer
-
Call Transfer enables you to transfer the person you’re talking with to another number. To Transfer a Call, follow these steps.
Tell the first caller you’re transferring the call.
Press the Recall button on your telephone.
Dial the telephone number for the person you want to transfer the call to.
If you want to explain to this person that you’re transferring the call and introduce the caller, wait until the call is answered. After the new person has agreed to accept the call, hang up your telephone and the call will be transferred. (If the new person doesn’t answer, or doesn’t want to accept the call, press the Recall button again to return to the first caller.)
If you don’t need to introduce the caller, hang up your telephone as soon as you hear the ringing tone for the new person’s telephone. The call will continue as though the first caller had made a direct call.
-
Call Waiting
-
If you are on the phone and someone else calls, call waiting allows you to answer the call and swap between the two calls. You know when the second call arrives because you hear a series of short tones. Caller ID for call waiting displays the second caller’s number on your phone, and so helps you to choose whether or not you want to take the second call.
Disable Call Waiting – *70
-
Distinctive Ringing
-
Use this feature to assign a different ringtone to incoming calls from specific phone numbers. For example, calls coming from your office can ring differently from other incoming calls.
-
Do Not Disturb (DND)
-
Use this feature to temporarily to prevent all incoming calls. You can continue to make outgoing calls normally while DND is activated.
Activate Do Not Disturb – *33
Deactivate Do Not Disturb – *34
-
Find Me Follow Me
-
Like SimRing, you use this feature to ring phones at other locations (such as your mobile, office, home) when you receive a call. However, unlike SimRing, Find Me-Follow-Me allows you to decide whether your phones will ring simultaneously or in a specific order you choose.
Activate Find Me-Follow Me – *371
Deactivate Find Me-Follow Me – *372
-
PIN Change
-
Your PIN is required to access some features through the handset. Features like Call Barring and Remote Access to Call Forwarding require you to enter your PIN when you’re changing the settings via your phone to ensure that you’re the only person with access to these features. To change your pin, use the following access code and follow the voice prompts for further instructions.
PIN Change – *319
-
Reminder Calls
-
With the Reminder Calls function, your home phone can act as an alarm clock or remind you of an appointment when you set it to ring at a particular time. You can set up individual reminder calls within the next 24 hours, or reminder calls that recur either daily, weekly or monthly. To set up reminder calls from your telephone, use the following access codes, and follow the voice prompts for further instructions.
Set up a reminder call – *310
Cancel all reminder calls – *311
Cancel one reminder call – *312
Check the reminder calls you have set up – *313
Set up a repeating reminder call – *314
Cancel all repeating reminder calls – *315
Cancel one repeating reminder call – *316
Check the repeating reminder calls you set up – *317
-
Selective Call Acceptance
-
Use this feature if you want to allow only specified numbers to reach you. All calls from numbers not on your accepted list will be rejected.
Activate Selective Call Acceptance – *64
Deactivate Selective Call Acceptance – *84
-
SimRing
-
Set up all your phones – home, office, cell, etc. – to ring simultaneously whenever you get a call.
Activate SimRing – *361
Deactivate SimRing – *362
-
Speed Calling
-
With Speed Calling, you can set up short dialing codes for the phone numbers you use most often. Create one and two digit speed codes to represent full phone numbers, and you can dial just one digit to phone your best friend or a family member.One digit speed codes can be in the range of 2 to 9. Two digit speed codes can be in the range of 20 to 49.The full telephone number corresponding to this code is dialed after a 4-second delay; but you can force immediate dialing by dialing # after the Speed Calling code. To set up Speed Calling from your telephone, use one of the following access codes.
You will hear a broken dial tone.* Dial the Speed Calling code you want to use, followed by the full telephone number you want to access using that code. You will then hear a confirm tone.*
For subscribers using SIP telephones, this service operates differently.
You should dial the access code, Speed Calling code, and full telephone number together and only then press the dial button.
Set up 1-digit Speed Calling – *74
Set up 2-digit Speed Calling – *75
-
Three Way Calling
-
Three Way Calling allows you to put one caller on hold while you dial another caller’s number, and then link the calls together so all three of you can talk at the same time. To set up a Three Way Call:
Tell the first caller you’re putting the call on hold.
Press the Recall button on your telephone.
Dial the telephone number for the other person you want to include in the call.
When this person answers, press the Recall button again to link the calls together. All three of you should now be able to hear each other. (If the new person does not answer, press the Recall button again to return to the first caller.)
If you want to disconnect the new person so you’re only talking to the original caller, press the Recall button again.
If you hang up your telephone while the first caller is still on hold (that is, before you’ve pressed the Recall button to link the calls or to return to the first caller), your telephone will ring immediately. When you pick it up, you’ll be reconnected to the first caller.
-
Withhold Number
-
If you don’t want your number to appear in someone else’s caller ID, you can withhold your number and you will be listed as anonymous. Note that if someone has set up their phone to reject anonymous calls, your call will be rejected. To control whether your calls are anonymous from your telephone, use the following access codes before you make your call.
Withhold my number on following call – *67
Send my number on following call – *82
For information on all available features or to modify features online, visit myphone.aeneas.net.
-
-
PBX Systems
-
-
Internet & Email
-
-
Aeneas Email Accounts
-
Aeneas Mail Server Settings
Incoming: mail.aeneas.com
Outgoing: mail.aeneas.com
-
Setting Up an Email Account in Microsoft Outlook
-
Open Microsoft Outlook.
Under the tools menu, choose email accounts.
Next select add a new email account.
Under server type choose POP3.
Under internet email settings, fill in your name, username (yourusername@aeneas.com), e-mail address and password information.
For both incoming mail server and outgoing mail server enter the following: mail.aeneas.com.
Now choose the more settings button.
Once here, select the outgoing server tab and checkmark my outgoing server (SMTP) requires authentication.
By default this option should already be set to use same settings as my incoming server.
-
Setting Up Your Aeneas Email Account on an iPhone
-
If this is the first email account you’re setting up on your iPhone, tap mail. Otherwise, from the home screen, tap settings.
On the settings screen, tap mail, contacts, calendars.
On the mail screen, under accounts, tap add account.
On the welcome to mail screen, tap other.
Enter your account information using your keypad.
Name – Enter your name as you want it to display on email messages you send.
Address – Enter your email address.
Password – Enter your password for your email account.
Description – Enter a description of this email address. The description displays in your email account list on your iPhone.Tap Save.
Select POP.
Enter Incoming Mail Server information.
Host Name – mail.aeneas.com
Username – Full email address
Password – Password for the e-mail accountEnter your outgoing mail server (smtp) information.
Host Name – mail.aeneas.com
Username – Full email address
Password – Password for the email account
Authentication – Password -
Manage Your Aeneas Email Accounts
-
Aeneas provides you with 5 free email accounts. Your default email account is set up as the username you provided. You can login to the User Manager at webmail.aeneas.com to add or delete up to 4 extra accounts and change your email passwords.
To set up additional e-mail accounts
Once logged into your User Manager panel on webmail.aeneas.com, select the Open Admin Panel button.You will see two options: one for adding a user and one for adding an alias.
To create a brand new email account fill in the “add user” fields.
If you would like to create an email address that will simply forward to an existing email account, you should fill in the “add alias” fields.
To delete an email account
Select the email you would like to delete from the list of emails, then click on the delete button.To change your email password
To change your Aeneas email password, just follow these 6 easy steps…Go to webmail.aeneas.com.
Login under User Manager.
Once logged in, click on Edit User under the “Type” section.
Enter a new password meeting the following requirements:
– At least 8 characters in length – No more than 20 characters in length – At least one number [0-9] character – At least one upper-case letter – At least one lower-case letter – At least one special character from the following: =?!@#$%^&*()~`+After changing your password, click the Edit User button.
That’s it! You’ve changed your password!
-
Setting Up Your Aeneas Personal Name Email Account
-
Aeneas Personal Name Email Accounts are a great way to represent yourself online! All emails sent to your Aeneas Personal Name Email will be received at the email address you specified. (If you need to change the address where you receive your emails, please contact us!) When you send emails, your default email address will be displayed, unless you change the outgoing settings on your email program.
-
Aeneas DNS Server Settings
-
209.173.39.1
209.173.36.11
209.173.45.11
-
Virtual Fax
-
RECEIVING FAXES
Receiving faxes is automatic! When a fax is sent to your Aeneas Virtual Fax number it will automatically be sent as a .PDF file to the email (or emails) you chose during sign-up. Fax emails will be titled as Fax from Sender’s Fax Number.SENDING FAXES
Sending faxes is easy. All you need to send a fax is an Internet connection.Note: Legal sized documents cannot be faxed with Aeneas Virtual Fax. Fax must be letter sized (a maximum of 8.5″ x 11″).
Login to our website at VIEW MY FAX.
Use your 10 digit fax number as your username.
Use the last 4 digits of your fax number as your password.
You can change your password once you login by choosing Change Password on the left under Account Settings.
Once you’ve logged in, you will see this simple screen.
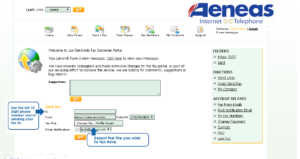
You don’t need to enter a 1 if the fax you are dialing is out of your area code, just enter the full 10 digit fax number.
Once you’ve filled out the fax number you are sending to in the to field, select the file you want to send. Make sure the file is in a .DOC, a .DOCX or a .PDF format. Currently, .XLS files must be converted to a .PDF to fax.
When the correct file has been selected, hit GO.
Your fax has now been sent.
For questions, contact technical support 7 days a week.
-
-
Plume HomePass - Content & Parental Control
-
-
How does content access work?
-
The Content access feature will allow you to restrict content for a device or person. We have four content filtering categories that you can use to personalize your online experience.
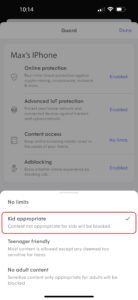
When setting up content filtering for a person or device, you can enable any of the four content filtering categories:
- No limits: You can access all types of content.
- Kids appropriate: Content that is tagged as NOT appropriate for kids will be filtered and inaccessible.
- Teenager friendly: Content that is tagged as NOT appropriate for teens will be filtered and inaccessible.
- No adult content: All content tagged as adult content will not be accessible.
How to restrict content by enabling a filtered category on a device?
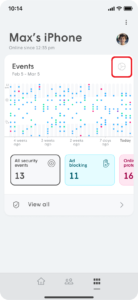
- In the Adapt section, select the device in the app to access the device details page.
- In the Events section, toggle the settings symbol.
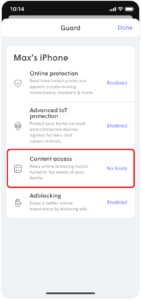
- Tap on Content Access and select one of the 4 filtered categories.
- Tap Apply, to save your selection.
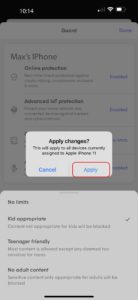
Please note that all devices associated with a person will inherit the content access settings assigned to that corresponding person. Likewise, applying content access restrictions to a device assigned to a person will apply the same settings to that person. However, if the device is unassigned, the rule will only apply to the device.
Content access will not work if Privacy Mode has been enabled or if the device is using a Private/Random MAC Address.
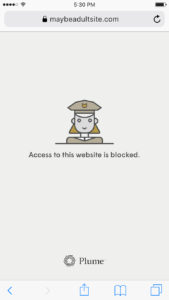
What is seen by the end-user when their content is blocked?
Content that was restricted by our security feature whenever you see the “Access to this website is blocked” message displayed in their browser window.
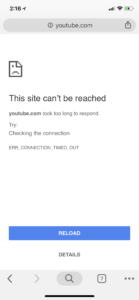
Note: This only appears for HTTP sites; HTTPS sites prevent this and display the browser’s default “can’t be reached” message. HTTPS connections cannot be redirected to the HTTP blocked page because it would break the secure trusted SSL connection.
-
Set a global or custom Internet Time Out
-
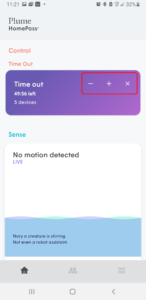
HomePass gives you the ability to briefly freeze or pause internet access globally for multiple devices instantly through the Time Out feature.
If you want to set a scheduled Internet break, consider our Device Freeze feature.
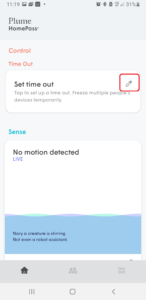
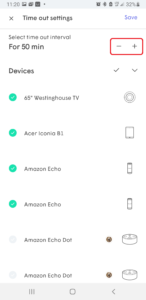
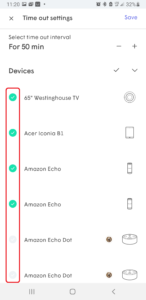
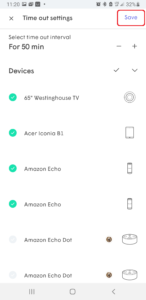
Setting a custom Time Out for multiple devices
- From the Home screen scroll to the Control section and find the Time out menu.
- Under Set time out, tap on the pencil icon to create your custom time out.
- Use the + or – buttons to modify the Time out period in 10-minute increments.
- Tap on the devices checkmark next to all the devices you want to be affected by this Time out.
- Tap on Save to return to the previous screen.
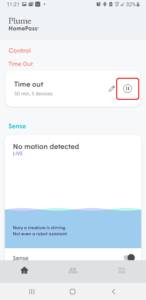
- Tap on the pause icon to activate the Time Out. All devices selected will now have Internet access blocked. The Time Out timer will count down until expiry.
- Use the +, – or x to modify the duration or cancel the Time Out.
-
Pausing Internet access with a Time Out
-
What is a Time Out?
A Time Out gives you the ability to briefly freeze or pause Internet access for a person or specific device with just a few taps. This lets you easily manage Internet access in real-time in addition to setting Device Freeze schedules. There are two ways to use a Time Out:
- Set a custom or global Time Out for all people or devices (any timeframe in 10-minute increments)
- Set a Time Out for select people or devices
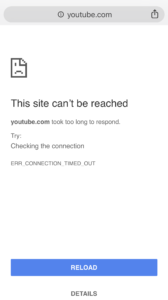
What will the user see when in a Time Out?
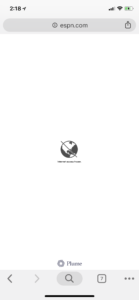
When a device is frozen, it will not be able to access Internet content. When trying to load an HTTP site, they will be redirected to the captive screen (left). However, if it is an HTTPS site, the page will simply timeout or say it cannot be reached (right).

Non-browser devices like media players and game consoles will simply get an Internet connection error when they are in a Time Out.
-
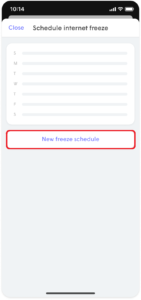
How do I schedule an Internet Freeze for a device?
-
Internet Freeze allows you to easily manage how much time is spent on the internet by a device or person by using a Freeze schedule or as needed.
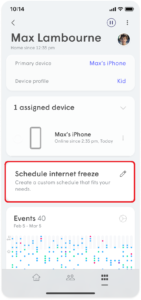
Schedule or Turn on Internet Freeze for a device
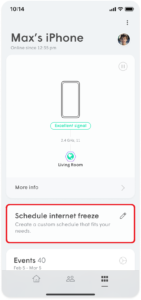
- In the Adapt section, select the device in the app to access the device details page.
- Tap on Schedule Internet Freeze.
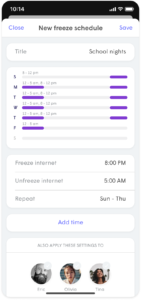
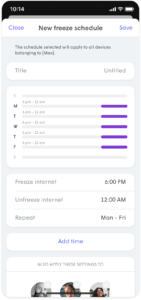
- Type in a name for this Freeze schedule.
- Tap on a day and enter the Freeze internet (start) time and Unfreeze internet (end) times.
- Choose the Repeat option if this schedule will be the same on multiple days or tap on another day to set different Freeze and Unfreeze times for that day.
- Choose a person if this Freeze schedule will be used for all of their devices.
- Tap on Save once your schedule is complete.
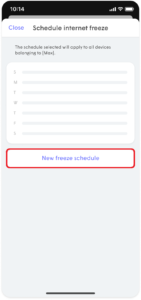
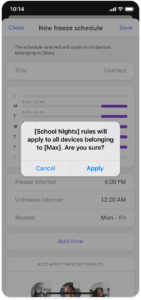
Schedule or Turn on Internet Freeze for a person
- Select the person from the People page.
- Tap on Schedule Internet Freeze.
- Type in a name for this Freeze schedule.
- Tap on a day and enter the Freeze internet (start) time and Unfreeze internet (end) times.
- Choose the Repeat option if this schedule will be the same on multiple days or tap on another day to set different Freeze and Unfreeze times for that day.
- Tap on Save once your schedule is complete and Apply to confirm.
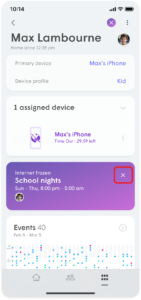
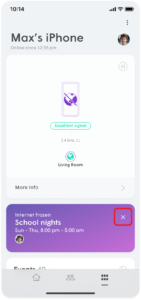
Interrupt Internet Freeze
You will be able to interrupt the internet freeze by either choosing Unfreeze Until End of Day or Clear Internet Freeze to reset the freeze internet schedule.
What will the user see when frozen?
When a device is frozen, it will not be able to access content. How that is displayed depends on the content you are trying to access. If you try to load an HTTP site, you will be redirected to the captive portal screen. However, if it is an HTTPS site, the page will simply timeout or say it cannot be reached.

Plume also gives you the ability to pause internet access on a device or person instantly through the Time Out feature.
-
-
Plume HomePass - Passwords & Access Control
-
-
Create a new WiFi password for Home
-
During the initial setup, the first password created is a Home zone password, although you can add more to the WPA2 SSID. Local network access to devices connected to your network in the Home zone can be selectively shared with devices connecting with a Guest zone password.
Note: Multiple Passwords are not supported in the WPA3 WiFI.
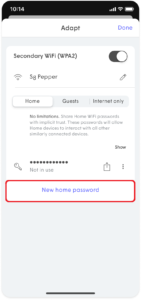
- Open the Settings tab and tap on the Adapt button.
- On the WPA2 SSID, tap on the Home button.
- While on the Home settings page, tap on New home Password.
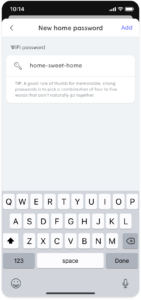
- Enter your new password.
- Tap on the Add to save.

-
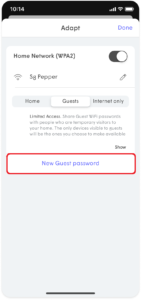
Create a new password for a Guest
-
Multiple guest passwords can be used under a single WPA2 SSID.
Note: If you are only using WPA3, you will have to enable the WPA2 SSID in order to create Guest passwords.
-
- Open the Settings tab and click on the Adapt button.
- While on the Guest settings page under the WPA2 SSID, tap on New Guest Password.
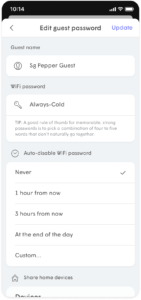
- Enter a name* and a new password.
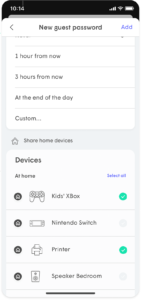
- Use the drop-down arrow next to Auto-disable WiFi Password and choose one of the options.
- Add a checkmark next to one or more Shared Home Devices (printer, NAS, media player), to allow your guest access to it over the local network.
- Tap on the Add to save.
*You can set up different device access permissions and Auto-disable WiFi Password settings for each name under the Guest zone

Note: Guests will only be able to connect to the 2.4GHz and 5GHz bands since 6 GHz operation on compatible hardware also require WPA3.
-
-
How do I disable or change a WiFi password?
-
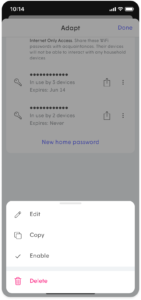
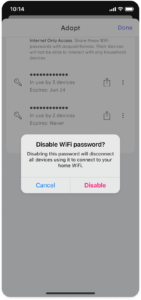
You can easily edit, delete, or temporarily disable a password by using the HomePass app. You can also edit the access level of any user with guest access.
To suspend or control access on a device level, use the Device Freeze feature.
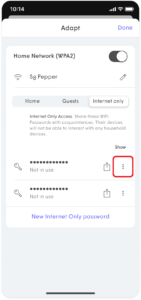
Editing WiFi passwords
- From the Settings menu, tap on the Adapt option.
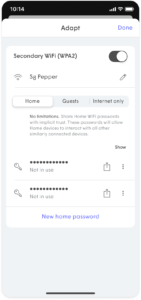
- Under the WPA2 SSID, tap on Home, Guests, or Internet Only to access that zone’s page.
- Tap the ⋯ next to the password you want to modify.
- Choose Edit, Disable, or Delete.
- In the case of Disable or Delete, confirm your selection. If you are editing a password, go ahead and make your changes.

-
-
Plume HomePass - Network Monitoring & Management
-
-
How can I check the most active devices on my network?
-
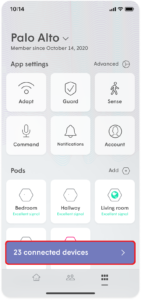
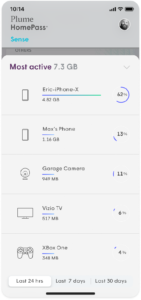
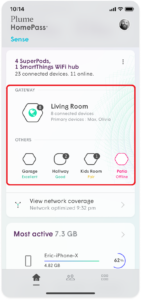
- From the Home page, scroll down to the bottom of the Adapt section to view the Most active menu. The most active device on your network will be displayed along with the amount of data it has used in both percentage and megabytes.
- Use the > to expand the list to the 5 most active devices on your network.
- Use the toggles to switch the time period from the Last 24 hrs., Last 7 days, and Last 30 days.
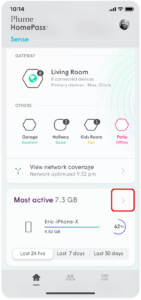
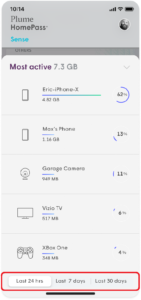
Note: Total data downloaded for your network is calculated from all Wi-Fi connected devices in your network. Ethernet connected device consumption currently is not tracked.
-
Setting up Port Forwarding
-
What is Port Forwarding?
Port forwarding (opening ports) allows you to open specific ports in the router’s firewall which are needed by some services to communicate to devices on your network. A port has an internal and external value called the port number. Multiple external hosts can use the same external port number, but each internal port must be different, this allows Network Address Translation (NAT) to identify the destination for inbound traffic.
Port forwarding is necessary when you are having issues related to a restricted NAT.
Where do I find Port Forwarding settings?
UPnP allows services to automatically set up port forwarding rules, although you can also manually set up port forwarding. Manual setup can be tedious if you are setting rules for multiple services and multiple devices. You should not enable UPnP and set up port forwarding at the same time.
Because you are opening/forwarding ports in the firewall, this setting must be set in the router. If Plume is in bridge mode, you will need to set up port forwarding rules in your router. If you are using Plume in router mode, port forwarding can be set up in the HomePass app:
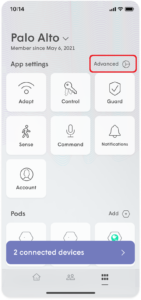
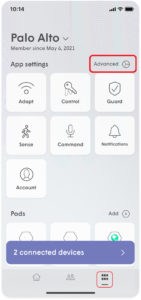
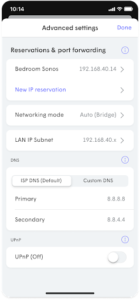
- In the Adapt section, tap on the gear icon and open the Advanced Settings.
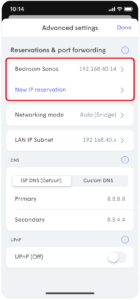
- You need to set an IP reservation for the local device.
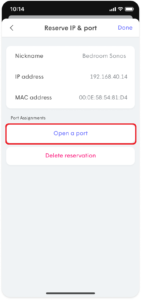
- From the IP reservation page, tap on Open Port.
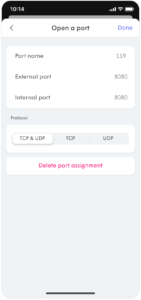
- Enter a name for the rule (each name needs to be unique).
- Enter the External Port number the service requires.
- Enter the Internal Port number* to be used on the device.
- Use the same number as the external to just open the port or another number to route the traffic to a different port.
- Choose the required Protocol.
- Tap on Done.
- Repeat these steps for each rule needed.
- If the external port has already been used for one service, it is not necessary to set it again for a different service on the same device.
- The external port number for each rule can be the same, however, the internal port number must always be unique. This means you will need to choose another internal port number for each local device.
-
How do I enable UPnP?
-
What is UPnP?
UPnP allows a device or service to automatically configure the needed port settings on the NAT required to communicate properly with other devices and servers. Without UPnP, port forwarding rules will have to be set on the router manually, which becomes tedious if you need rules for multiple devices and/or services.
UPnP is commonly used help ensure an unrestricted NAT, which is needed for most multiplayer games.
How do I enable UPnP?
If you are running Plume in bridge mode and have a separate router, you can usually find the UPnP setting in the router’s, Firewall or NAT settings. If Plume is operating in router mode, follow the instructions below to turn on UPnP in the HomePass app.
- In the More menu, open the Advanced Settings (Gear icon).
- Tap on the Adapt menu.
- Slide the UPnP toggle to the right.
-
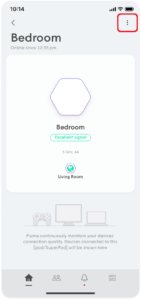
How do I rename my pod?
-
Each pod is provided with a default name when you set it up the first time. Renaming a pod allows you to choose your own pod names, making it easier for you to identify the pods and their location.
- From the Home screen scroll down to the Adapt section and tap on the pod you wish to rename.
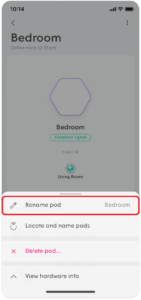
- Tap on the ⋮ and choose the Rename pod option.
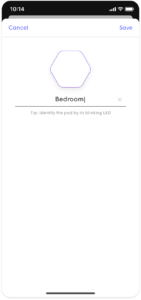
- The LED on the pod being renamed will be blinking. Type in the new name for the pod and then on Save.
-
-
Plume HomePass - Security & Privacy
-
-
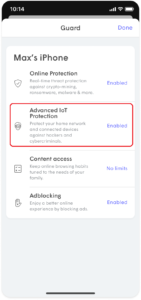
How is Advanced IoT Protection different from Online Protection?
-
Advanced IoT Protection (AIP) is a security advancement found in Plume Guard. Prior to its release, Online Protection protected all your connected home devices from going to sites known to host malware, spam, or phishing attacks. AIP provides protection from new, unknown attacks that are currently not part of any known threat intelligence database. It can detect unusual patterns in your IoT device’s activity that indicates the device may be infected.
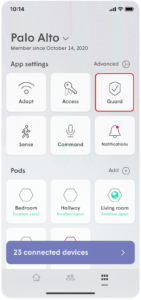
Advanced IoT Protection can be enabled via the Guard tab from within the more menu.
-
I see Advanced IoT Protection blocked an event. Now what do I do?
-
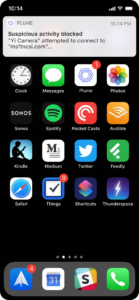
If there is a suspicious activity blocked event, you probably received a push notification warning you that a smart home device went to a website which is considered unusual compared to its normal behavior. There is no required action on your end other than enjoying the peace of mind that Plume is protecting you and your family!

-
What if Advanced IoT Protection blocks a site that is actually safe?
-
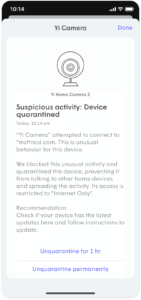
When an anomaly is detected, the device will automatically be placed into quarantine to protect the integrity of your network and the devices connected to it. Quarantining the device effectively places “Internet Only” permission on the device, allowing basic functionality while preventing access to your other home devices.
Advanced IoT Protection (AIP) uses machine learning on device network metadata to establish known behaviors. However, sometimes safe sites can be flagged as a false positive. If a new behavior comes across our large training samples or if device behaviors are updated by the vendor, the device may be incorrectly flagged. Learning happens continually to establish new normal behaviors, however can cause some alerts in the interim. If you trust the website the device is accessing, you can whitelist it for the device and for all devices in the home.
When Should I Remove a Device From Quarantine?
You should only remove a device from quarantine if you trust the website it was trying to access. On a quarantined device, there is a recommendation that will open a web search for the device’s manufacturer website, so you can do more research or find updated firmware before removing the device from quarantine.
Removing a Device from Quarantine
- Open the device list and navigate to the Internet Only devices.
- Find the affected device. The affected device will be labeled: Device is quarantined.
- Tap on the quarantined device for more options.
- You can choose Unquarantine for 1 hour or Unquarantine permanently.

-
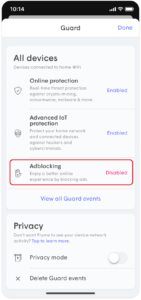
How does Adblocking work?
-
Adblocking will help you block web and video advertisements as well as requests to known ad servers. You can enable this for either a device, person profile, or everyone. When you enable Adblocking for a person, this setting will be applied to all the devices assigned to that person.

-
-
Plume HomePass - Signing in
-
-
How do I sign in to the HomePass app?
-
Once subscribed to Managed WiFi or Whole Home WiFi, you will receive an email containing your login email and a request to reset your password. You must reset your password in order to login.
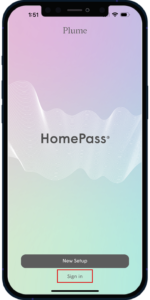
- Download and open the Plume app.
- Click on “Sign in.” (Do not click on the “Set up” button)
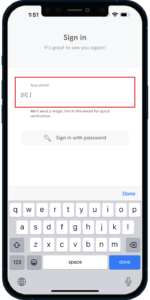
- Type in your given email. (by default, your login email will be the email associated with your Internet account)
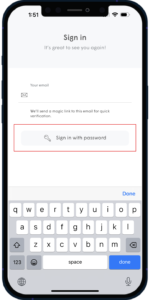
- Click on “Sign in with password” button.
- Type in your new password.
-
